Showing posts with label diy. Show all posts

Sunday, January 13, 2013

Easy DIY Ombre


I absolutely love ombre highlights like those seen here on Kate Beckinsale (left) and Rachel Bilson (below) and I really really hope it remains a trend for a while because it is just SO easy to wear! No roots, no need for touch ups. I had mine professionally done, but I have several friends that bravely allowed me to experiment on them :)


I watched several videos on YouTube, professional and DIY. I found the technique seen in the following video, particularly interesting.


This technique seems kind of weird, and slightly risky, but it works!


For Rivka's hair (above) I used a blue bleach and a 30 developer, mixed to the consistency of pudding. This worked well, just took a little while to develop. For Monica (below) I used the 40 which went much faster, but her hair was much lighter to begin with than Rivka's. All my supplies were purchased at Sally's Beauty Supply.


Section hair off into 3 levels.


Starting at the bottom layer (your lightest) section off smaller areas and back comb hair towards the scalp.


This will naturally thin out the hair that you will be lightening. Apply lightener and foil to thinned out section of hair. Pull out a few small section to lighten around the face and do these along with your bottom layer. Wait a few minutes before starting the next section, to give this area the longest processing time. Begin working on the middle section in the same way as the bottom. Wait a few minutes, then begin on the top layer. Keep a close watch on how your bottom layer is processing in contrast with the top. The bottom should be the lightest and the top the darkest. Wash and condition hair, style and enjoy the results!

Wednesday, December 19, 2012

DIY Fabric Books $.99 Easy Gifts

These panels are so easy and fun. They can be purchased for as little as $1.00.


Trim the edges leaving a consistent seam allowance.

Each panel comes instructions of what pages should be sewn together.


Sew them together and press.

Trim the corners, so when you turn them the corners will be square.

Turn the pages right side out.


Sew down the center of the book creating a binding and connecting the pages.


~Julia

Tuesday, December 4, 2012

100 Handmade Christmas Gift Ideas

Handmade gifts are fun, thoughtful and can be very budget friendly! They don't have to be cheesy or tacky. On the contrary, the popularity of handmade items has skyrocketed in recent years with more and more people making an effort to shop locally, support small businesses and buy things that are Eco friendly. Check out all the great ideas that are sure to  be a hit with your family and friends. For lots and lots of ideas like those pictured on the left, check out the Handmade Holiday's collection found here. If you're not very confident in your own crafting abilities, consider supporting great small businesses and stay-at-home moms that have set up shop at sites like Etsy 

>> Gifts for Kids <<

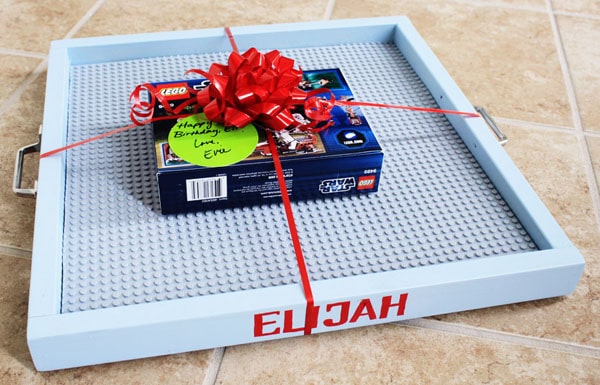
Build this nifty personalized Lego tray using the tutorial found here


Make a fun place to store and carry cars! Find the tutorial here


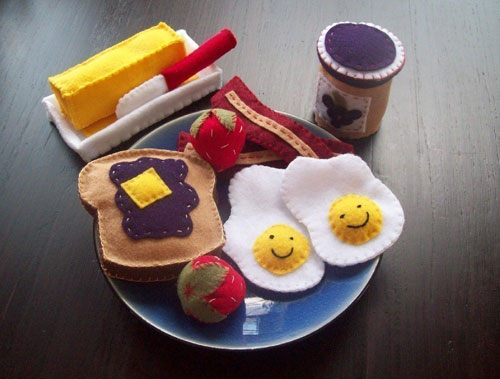
An adorable selection of felt food! Find lots of ideas here

Makeitdo has a very cute tutorial on a Snowman Kit.


>> Gifts for the Home <<

Burlap Wreaths are so versatile for every season.

Gift Ideas for the Baker at I Heart Organizing

These pinecones are transformed here by Martha Stewart.

Fabric Covered Boxes Get the tutorial here.

Grab a frame from your house and download this 

Burlap Rose Wreath Tutorial

Frame a Sentimental Family Saying! For this idea, Click Here


Easy to create Felt Stockings


 >> Easy Gifts for Kids to Create and Give <<

Here's a great opportunity to create some fun gifts for friends and loved ones. This no sew apron is a wonderful intro.

Kids love making Salt Dough Ornaments!

Peppermint Ornaments that while being created and popped in your children's mouths will not hurt them :) Thanks, Martha Stewart and crew.

Find full instructions here Angel Paper Plates provided by Martha Stewart.

Cinnamon Ornaments Click here for the recipe.


>> Gifts for Santa <<

Milk for Santa from DukesandDuchesses.com

Many families make cookies for Santa, but here's a cute gift around that theme from makeitdo.


>> Accessories and Apparel <<

This easy to sew tutorial from Design Sponge for a zipper case could be used for school supplies, make up or a small assortment of anything!

Here's a cute iPad or Tablet case!!

American Girl Matching Clothes Set


We've Linked Up With These Great Blogs!!

Thursday, October 25, 2012

Convert Disc to Digital for a Better Price Than WalMart! FREE!!


With iPads, tablets, larger hard drives, etc, the desire to have your movies in an mp4 format has grown. The problem is that you have already paid for your movie and don't want to either buy it again or have Wal Mart convert it for $2.  I will show you how to convert it for free on your own.

I am one of the least "techie" people you could know. If I can do it, you can do it!!

~Julia

Tuesday, August 7, 2012

How To Finish the Corners on Your Quilt


Finishing the edges on your quilt is not too hard, but getting a finished edge on your corners is a little tricky. So, if you can't do facetime with your mom (that's what I did :) let me show you how to do it.


Step One:
Cut the top quilt to leave room to turn the fabric under for a finished edge.


Step Two:
Fold the corner in like a triangle to the edge.


Step Three:
Fold the edge over another time.


Step Four: 
Fold your edges over, and then fold them under for the finished corner. If you don't want to see the stitch then you will want to hand stitch it, otherwise you can use a zig-zag stitch in the corner.                                   


Tip: Make sure you do your corners before you sew too closely to the edge. Or just do them first.
I hope this helps!! ~Julia


If you want a more detailed explanation on making bias tape check this out. Click Here.

Friday, July 20, 2012

Storage Solutions for Stuffed Animals

I really never thought I'd be the mom that let her kids keep so many stinkin' stuffed animals! I always thought an over-abundance of stuffed animals was a little ridiculous, hey, I still feel that way. But, the secret stuffed animal lover that's hiding deep down inside me just seems to cave every time I look into their cute, cuddly little faces. I had seen pictures of the storage system found here and thought it was a great idea! I'm super cheap though, and I may be willing to admit my secret love of stuffed animals, but I'm not really willing to pay money just to keep them around. I had even stumbled upon the tutorial found here, but didn't want to pay for the materials, I just wanted to make something using what I had laying around the house.

Here's what I came up with!
Yes sir, totally works and I totally didn't spend a dime :)


I used 2 crates that were already on hand (their previous contents have found a new home!). I had some scrap wood that I simply cut to length and wrote on using a Sharpie paint pen. I drilled very small holes in the top and bottom of the crates, then pulled ribbon through and knotted the ends. I would have rather used a light weight bungee cord, but all I had were some standard, thick bungees that just didn't look right. I used what I had! I reinforced the knots on each end by covering them in hot glue. I hot glued the "Zoo" sign onto the crates and secured the whole thing to the wall by screwing it into a couple studs. Wallah!